
 Beetexting
Use the Organization-Level flow when one HubSpot account should be centrally connected and shared across multiple Beetexting sites. This model is best for enterprises or compliance-driven organizations that require a single authentication point and centrally controlled CRM-to-site routing.
How Organization-Level routing works
In this flow, contacts are associated with Beetexting sites based on CRM record values. The Super Admin chooses a HubSpot field that identifies the site, then maps each HubSpot value to the correct Beetexting platform site.
Step 1: Accessing CRM Integrations
Use the CRM tab in Beetexting to start a new CRM connection or manage an existing CRM integration. This option is available from the Integrations area for users with the required administrative permissions.
- Log in to Beetexting at app.beetexting.com.
(Use a Super Admin account, or an account with permission to manage CRM integrations.)
- From the left-hand navigation menu, select Integrations.
- On the Integrations page, click CRM.
- Click Connect to CRM to begin the CRM setup flow.
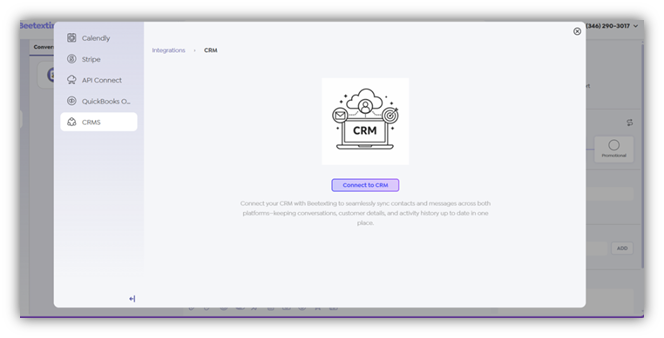
Figure 1: CRM integrations page
Description: The CRM page is available from the Integrations menu. If no CRM is connected, Beetexting displays a Connect to CRM button that starts the CRM setup process.
Step 2: Selecting the CRM Integration Level
For accounts with multisite enabled, Beetexting prompts the Super Admin to choose how the CRM integration should be managed. This choice determines whether one central CRM connection is shared across sites or whether each site can connect its own CRM account.
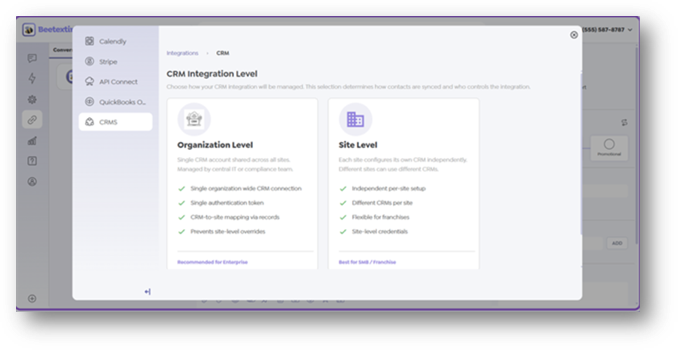
Figure 2: CRM Integration Level selection
Description: The Integration Level screen presents two options: Organization Level and Site Level. Organization Level is recommended for centrally governed enterprise setups. Site Level is recommended for SMB, franchise, or distributed setups where each site manages its own CRM connection.
|
Option |
Select this when |
Key behavior |
|
Organization Level |
One HubSpot account should be shared across multiple Beetexting sites. |
A central Super Admin configures the connection, selects the CRM site identifier field, maps CRM values to platform sites, and prevents site-level overrides. |
|
Site Level |
Each site should connect and manage its own CRM independently. |
Each site can use its own credentials and configuration. Different sites may connect different CRMs if supported. |
Non-multisite accounts
If the Beetexting account is not using sites, the user should not see or use the Organization Level/Site Level selection. The flow proceeds directly to CRM provider selection or HubSpot field mapping after OAuth, depending on the UI entry point.
Step 3: Select HubSpot as the CRM Provider
Use the CRM provider selection screen to choose HubSpot as the CRM system you want to connect at the organization level.
- Locate the HubSpot card on the CRM provider selection screen.
- Click Connect.
- Continue to HubSpot authorization. Beetexting redirects you to HubSpot, where you can sign in and authorize the connection using HubSpot OAuth.
After you are redirected to HubSpot, complete the authentication and authorization steps to continue the organization-level setup.
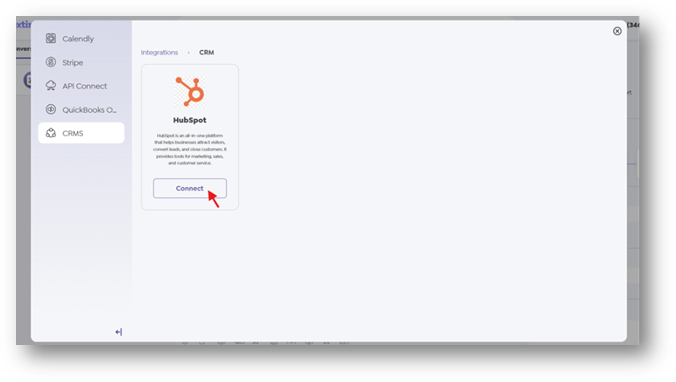
Figure 3: Hubspot CRM Selection
Description: The HubSpot card appears in the CRM provider list. Selecting Connect starts the HubSpot authorization flow.
Step 4: Authenticate with HubSpot
After selecting HubSpot as the CRM provider, Beetexting redirects you to HubSpot to complete authentication and authorize the connection.
- Sign in to HubSpot using an account that has permission to connect third-party applications.
- Select the correct HubSpot account, if prompted. If your HubSpot login is associated with multiple HubSpot accounts, choose the account that should be connected to Beetexting.
- Review the requested permissions. HubSpot displays the permissions Beetexting requires to complete the integration. Review the permissions carefully, then approve access to continue.
- Complete the authorization. After authorization is successful, HubSpot redirects you back to Beetexting.
Once you return to Beetexting, continue with the next organization-level configuration step.
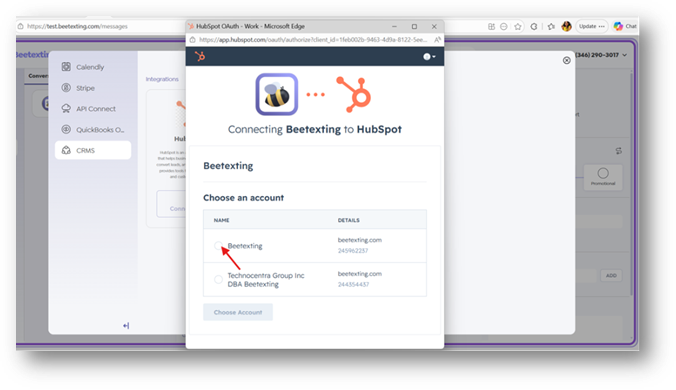
Figure 4: HubSpot account authorization
Description: HubSpot displays the accounts available to the logged-in user. The user selects the correct HubSpot account and authorizes Beetexting to connect.
Step 5: Configure the CRM Site Identifier Field
After HubSpot OAuth authorization is complete, Beetexting opens the HubSpot Settings screen for the Organization-Level setup.
The first required setting is the Custom Field that Beetexting uses to identify which site a HubSpot contact belongs to. This field must contain the site, location, branch, or similar value used in HubSpot.
- Open the Custom Field dropdown.
- Select the HubSpot property that contains site information for contacts.
For example, your organization may use a HubSpot property named Site, Location, Branch, or another custom property, depending on how HubSpot is configured.
- Refresh the HubSpot fields, if needed.
If the expected HubSpot property does not appear in the dropdown, create the field in HubSpot or make sure it is available for contacts. Then return to Beetexting and click Refresh Fields.
Confirm that the correct field appears in the dropdown.
Before continuing, verify that the selected custom field is the field Beetexting should use to match HubSpot contacts to Beetexting sites.
Switch to Site-Level setup, if needed.
If you selected the Organization-Level flow by mistake and want each site to manage its own CRM connection, click Switch to Site Level in the top-right corner.
When you switch to Site-Level setup, Beetexting disconnects the previously authorized HubSpot account and restarts the setup flow so you can configure the integration from the beginning.
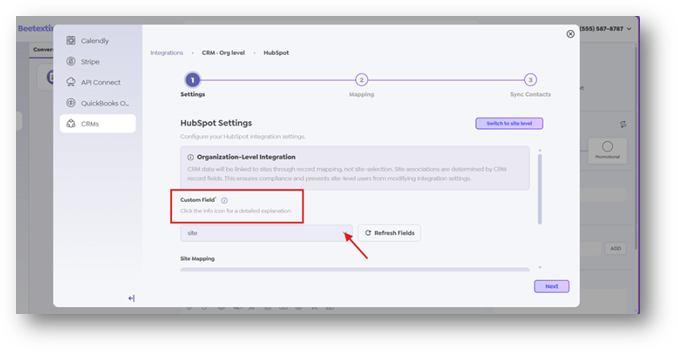
Figure 5: Organization-Level HubSpot Settings - Custom Field
Description: The Organization-Level HubSpot Settings page prompts the user to select the HubSpot custom field used to identify site values. The Refresh Fields button reloads available HubSpot fields after changes are made in HubSpot.
Step 6: Map CRM Values to Platform Sites
After you select the CRM site identifier field, Beetexting reads the values available under that HubSpot property and displays them in the CRM Value column.
The Super Admin must map each CRM value to the correct Beetexting Platform Site. This mapping tells Beetexting which site should be associated with contacts that have a specific value in HubSpot.
- Review each CRM Value displayed in the Site Mapping section.
These values come from the selected HubSpot site identifier field. For example, if the selected HubSpot field is Location, the CRM values may represent different locations, branches, or sites.
- Select the matching Platform Site for each CRM Value.
Use the Platform Site dropdown to choose the Beetexting site that corresponds to each CRM value. Each CRM value must be mapped to one Platform Site.
- Complete all required mappings.
Make sure every required CRM value has a matching Platform Site selected before continuing.
- Click Next to proceed to HubSpot Field Mapping.
After site mapping is complete, Beetexting uses these mappings to associate HubSpot contacts with the correct Beetexting site during sync.
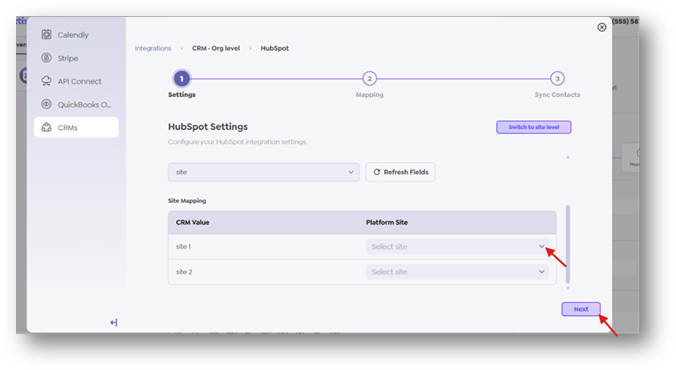
Figure 6: Organization-Level Site Mapping
Description: The Site Mapping table maps HubSpot CRM values, such as site 1 or site 2, to the correct Beetexting platform site. This ensures contacts from HubSpot are routed to the correct site in Beetexting.
|
Example CRM value |
Example Platform Site |
Purpose |
|
site 1 |
Main Site |
Contacts with site 1 in HubSpot are assigned to Main Site in Beetexting. |
|
site 2 |
Branch Site |
Contacts with site 2 in HubSpot are assigned to Branch Site in Beetexting. |
Configure Organization-Level field mapping
After HubSpot authentication is complete, Beetexting displays the HubSpot Field Mapping screen. On this screen, you can map Beetexting contact fields to the corresponding fields in HubSpot and define how data should sync between the two systems.
- Review the Beetexting fields listed on the page.
- Select a sync type for each field. The sync type determines how data is synchronized between Beetexting and HubSpot.
- Choose the matching HubSpot field from the HubSpot Field dropdown.
- Select the mapping direction, if you choose a one-way sync type. This determines whether data flows from Beetexting to HubSpot or from HubSpot to Beetexting.
- Configure the “Remove contacts deleted in HubSpot” setting, if available.
When this toggle is turned on, Beetexting checks whether a contact deleted in HubSpot has any existing conversations or tags in Beetexting.
- If the contact does not have any conversations or tags, the contact is permanently deleted from Beetexting.
- If the contact has existing conversations or tags, Beetexting keeps the contact and adds a note in the contact’s Notes section indicating that the contact was deleted in the CRM.
- Click Next to continue to the next step.
For more information about sync types and mapping directions, refer to the next section.
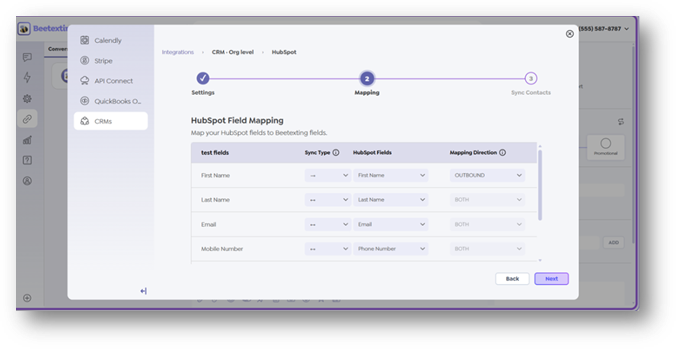
Figure 7: Organization-Level HubSpot Field Mapping
Description: The Field Mapping page allows the Super Admin to map standard Beetexting fields to HubSpot fields and configure sync type and mapping direction. In the screenshot, some rows use outbound or both-direction mapping behavior.
Remove contacts deleted in HubSpot toggle
Description: The lower portion of the field mapping page includes the Remove contacts deleted in HubSpot setting. When enabled, Beetexting can remove contacts that were deleted in HubSpot, except contacts with existing conversations, which are maintained and not deleted.
First-time contact pull for Organization-Level setup
After Organization-Level field mapping is complete, Beetexting asks whether to pull existing HubSpot contacts. If the Super Admin selects the pull option, Beetexting imports existing contacts and applies the site mapping rules configured earlier.
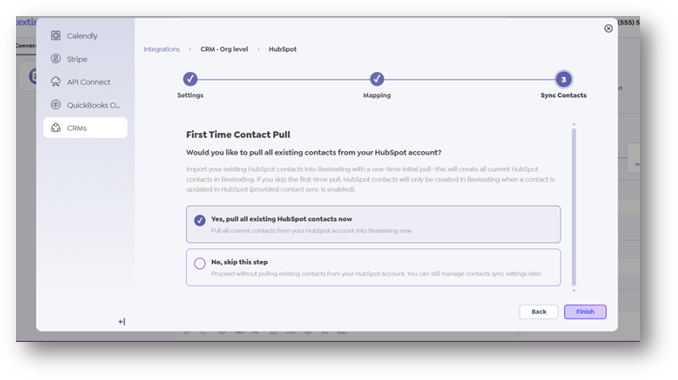
Figure 8: Organization-Level First Time Contact Pull
Description: The Organization-Level First Time Contact Pull page lets the Super Admin import all current HubSpot contacts into Beetexting or skip the initial import. Imported records use the configured CRM value-to-site mapping.
Organization-Level CRM Dashboard
After the Organization-Level HubSpot setup is complete, Beetexting opens the Organization-Level CRM Dashboard. This dashboard gives the Super Admin a centralized view of the connected HubSpot account, CRM sync activity, and sync history across all mapped platform sites.
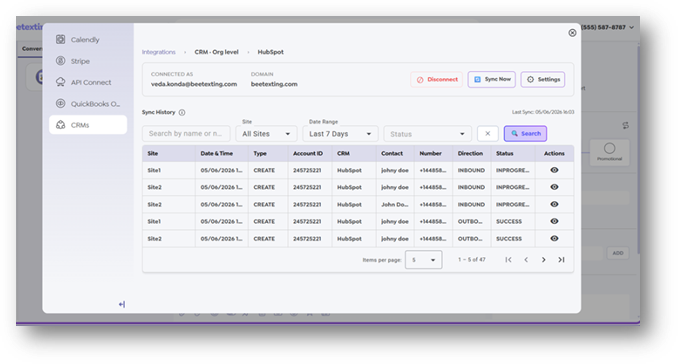 Organization-Level CRM dashboard and Sync History
Description: The Organization-Level CRM dashboard displays the connected HubSpot account and Sync History across sites. The table includes a Site column and a Site filter, allowing the Super Admin to monitor sync results for all sites or a selected site.
The dashboard includes the following key areas:
|
Area |
Description |
|
Connected As |
Shows the HubSpot user account currently connected to Beetexting. |
|
Domain |
Displays the organization domain associated with the connected HubSpot account. |
|
Disconnect |
Allows the Super Admin to disconnect the current HubSpot integration. |
|
Sync Now |
Manually starts a sync between HubSpot and Beetexting. |
|
Settings |
Opens the HubSpot integration settings, where the Super Admin can review or update configuration details. |
|
Last Sync |
Shows the most recent sync timestamp. |
|
Sync History |
Displays CRM sync records across all mapped sites or a selected site. |
Reviewing Sync History
Use the Sync History section to monitor contact sync activity between HubSpot and Beetexting.
The Super Admin can use the available filters to narrow the sync results:
|
Filter |
Purpose |
|
Search by name or number |
Search sync records by contact name or phone number. |
|
Site |
View sync activity for all sites or a specific mapped platform site. |
|
Date Range |
Filter sync records by a selected time period, such as the last 7 days. |
|
Status |
Filter records by sync status, such as successful, in progress, or failed. |
The Sync History table may include details such as the platform site, sync date and time, sync type, HubSpot account ID, CRM provider, contact name, phone number, sync direction, sync status, and available actions.
Use this dashboard to confirm that records are syncing correctly across sites, review recent sync activity, and troubleshoot any records that require attention.
Steps To Create a Custom Field in HubSpot
Step 1: Login to Your HubSpot Account
- Navigate to the HubSpot login page.
- Enter your registered email address and password.
- Click on the Log In button.
- Once authentication is successful, you will be redirected to the HubSpot dashboard.
Step 2: Navigate to the Contacts Section
- On the left-side navigation panel of the HubSpot dashboard, locate the CRM section.
- Hover over or click on CRM to expand the available options.
- From the dropdown menu, select Contacts.
- The Contacts page will open, displaying a table containing all existing contacts in your HubSpot account.
Step 3: Access the Property Management Options
- On the Contacts page, look toward the upper-right section near the Add Contacts button.
- Beside the Add Contacts CTA (Call-To-Action), you will see a vertical three-dot menu icon.
- Click on the three-dot menu to open additional options.
Step 4: Open the Edit Properties Section
- From the dropdown menu that appears, locate the Edit Properties option.
- Click on Edit Properties.
- You will now be redirected to the Properties Management page, where all existing contact properties are listed in a table format.
Step 5: Start Creating a New Custom Property
- On the Properties page, locate the Create Property button, usually positioned in the upper-right corner of the screen.
- Click on the Create Property CTA.
- A property creation panel or form will slide open from the right side of the page.
Step 6: Configure the Basic Property Details
Inside the property creation form:
Property Label
- Find the field labeled Property Label.
- Enter the name of the custom field you want to create.
Example:
- Location Preferences
- Product Categories
- Customer Interests
- Event Attendance
The label you enter here becomes the display name of the property throughout HubSpot.
Step 7: Select the Field Type
- Scroll to the Field Type section in the property creation form.
- From the available field type options, select Multiple Checkboxes.
What “Multiple Checkboxes” Means
This field type allows users to select more than one option for a single contact property.
Example: If the custom property is named Location, users can select multiple values such as:
- New York
- London
- Dubai
- Singapore
This is useful when contacts may belong to multiple categories or preferences simultaneously.
Step 8: Add Checkbox Options
- After selecting Multiple Checkboxes, an area will appear where you can define the checkbox values/options.
- Enter the custom options one by one.
Example options for a “Location” field:
- USA
- Canada
- Germany
- India
- Australia
- Click Add Option after each entry if required.
Important Note
- HubSpot allows a maximum of 10 checkbox options for this configuration in this setup.
- Ensure all required options are added before creating the property.
Step 9: Review the Property Configuration
Before finalizing:
- Verify that the Property Label is correct.
- Confirm that the Field Type is set to Multiple Checkboxes.
- Ensure all checkbox values are added properly.
- Double-check spellings and naming consistency.
This helps avoid future edits or duplicate properties.
Step 10: Create the Property
- Once all details are configured, locate the Create Property button at the bottom of the form.
- Click on Create Property.
HubSpot will now process and save the new custom property.
Step 11: Verify the Property Creation
- After successful creation, you will be redirected back to the Properties table.
- Search for the newly created property using the search bar if needed.
- The custom field/property should now appear in the properties list.
The property is now successfully created and can be used within:
- Contact records
- Forms
- Workflows
- Filters
- Reports
- Automation processes