Basic ITR Setup for Collecting Consent
Say hello to stress-free consent with Beetexting's Interactive Text Receptionist (ITR)!
Youโve probably heard of an IVR (Interactive Voice Response) for phone systems, right? Well, think of ITR as its text-savvy cousin! Instead of voice prompts, ITR works its magic through SMS.
Whether you need a simple menu or a super complex setup, ITRโs got you covered. Today, weโll show you how to use it to effortlessly gather consent from new contacts who text you. Plus, that consent is automatically updated in your contact's consent tracker.
No stress, no hassleโjust worry-free consent, right at your fingertips!
Let's Get Started: Set Up a Basic ITR for Gathering Consent
Setting up this ITR menu is super simple and a breeze to get going! Itโs all about creating a sequence with 7 layered automations, and guess what? Theyโre all prebuilt and ready to go in the Beetexting app!
Hereโs the 3 different types of automations you'll be layering:
New Conversation
Keyword
Tags
We are creating this automation with the assumption you are on the department line that is your Main Company Number. You can set up this ITR for any department line you would like.
Keeping Things Organized
Before you dive into building your ITR, letโs chat about **naming conventions**โtheyโre like labels for your automations that help keep everything tidy and stress-free.
Titles
Every automation needs a Title (for internal use only). To keep things organized and consistent, follow these simple naming conventions:
- Greeting Message: ITR - [DEPT. NAME] - [PURPOSE OF AUTOMATION] - [SEQUENCE NO.]
- Reply Messages: ITR - [DEPT. NAME] - [PURPOSE OF AUTOMATION] - [SEQUENCE NO.] - [REPLY KEYWORD]
- Tag Management: ITR - [DEPT. NAME] - [PURPOSE OF AUTOMATION] - [SEQUENCE NO.] - [REPLY KEYWORD]
Weโve already made it easy for you by suggesting names in the instructions! If your ITR is for your **main company number**, use "Main" in the name. Building one for a specific department like sales or service? Just swap "Main" with the department name.
Tags
Just like your titles, a solid naming convention for your ITR-specific tags keeps things tidy!
No worriesโ weโve already included the correct tag names in the instructions to help you out. For a basic ITR that collects consent preferences, we use this simple naming formula:
[DEPT. NAME] - [PURPOSE OF AUTOMATION] - [SEQUENCE NO.]
Ok - let's go!
Create Your Tags
Before diving into your automation setup, letโs get your tags ready!
To create tags, you'll need one sample contact in the system. We recommend using your own mobile number as a test contactโthis makes things easy and keeps everything organized!
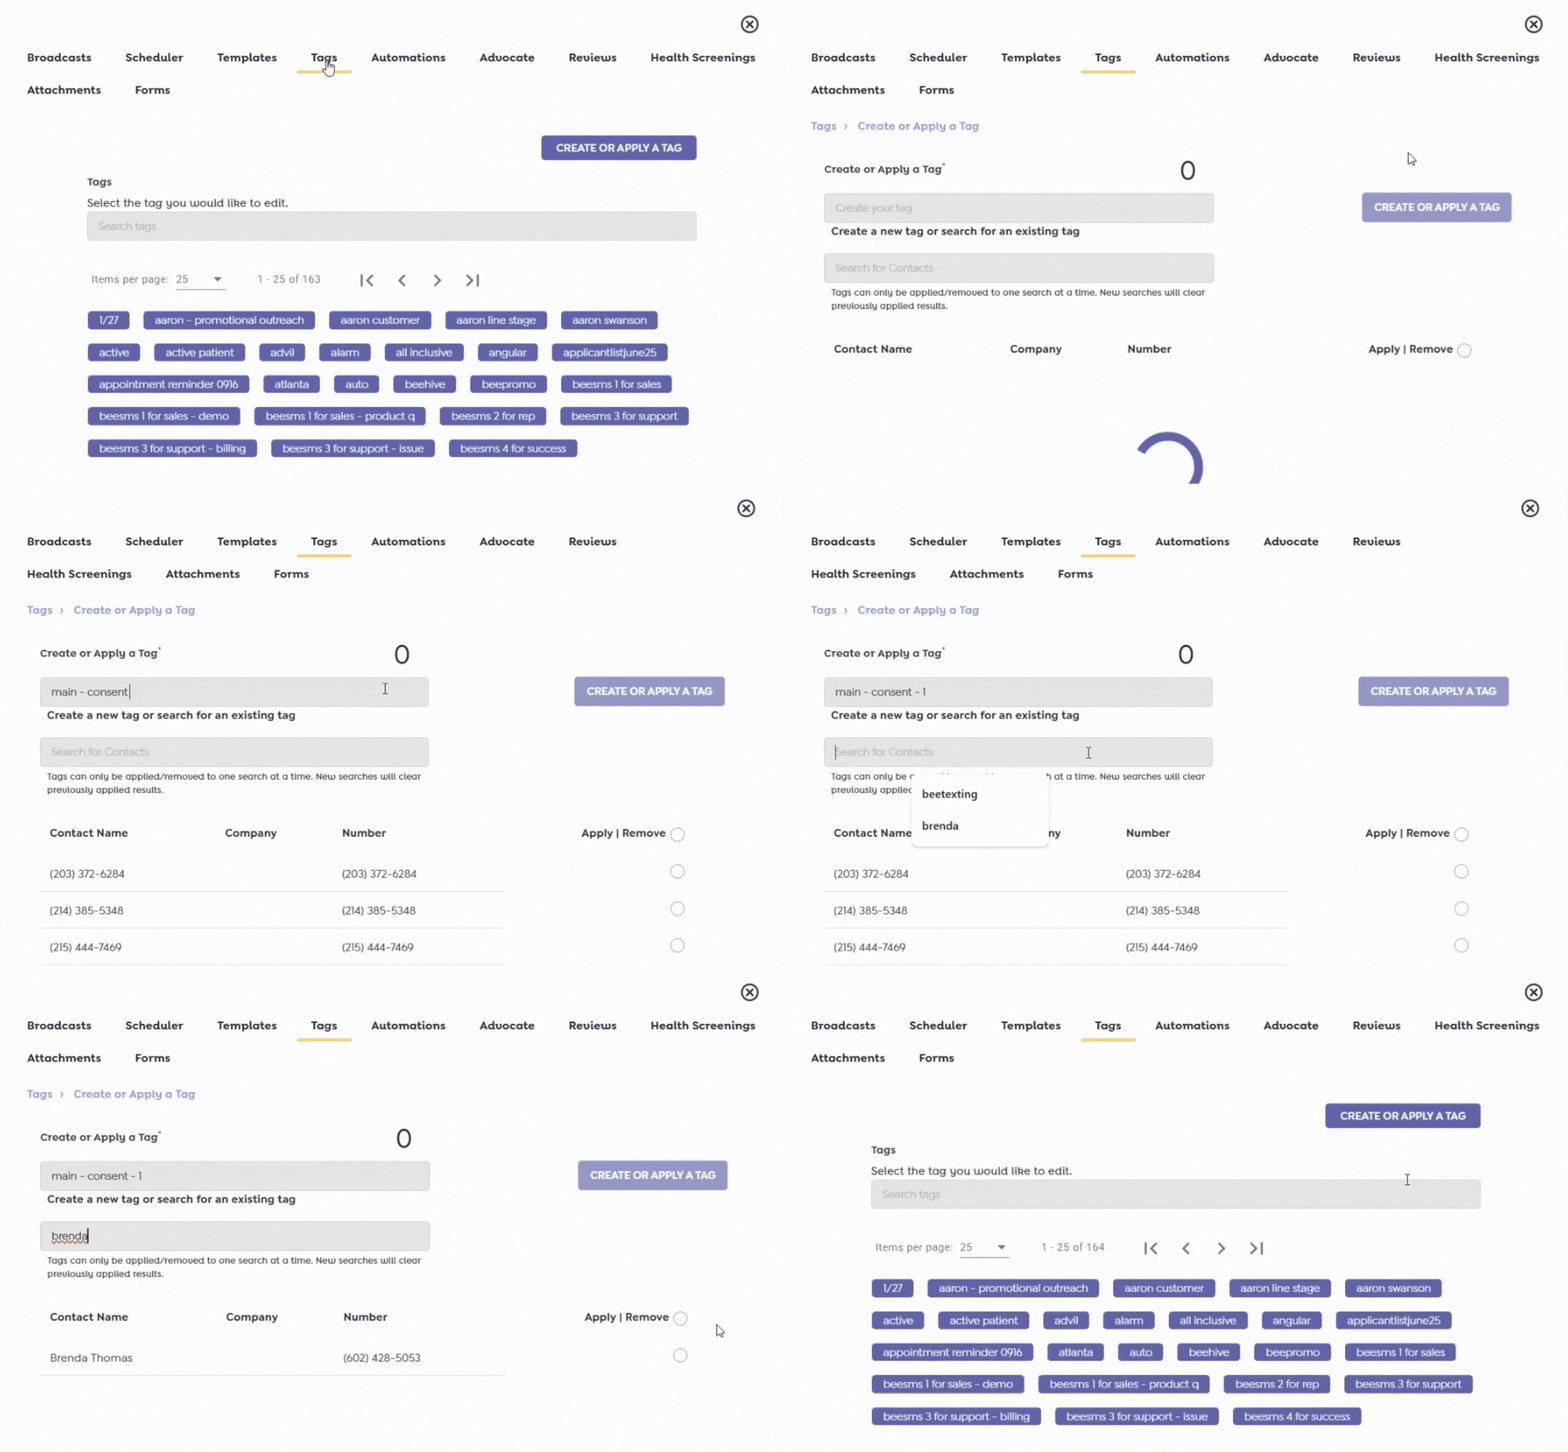
How to Create Your Tags:
Go to Tools in the left column.
Click on Tags from the top row.
Create a new tag and assign it to your test contact.
Repeat this for each of the following tags:
Tags to Create:
main - consent - 1
main - consent - 2
main - consent - 3
Thatโs it! Once your tags are set up, youโre ready for the next step in your automation journey.

Automation 1: Greeting
Your Greeting Message is the first step to creating a great impression and gathering your contact's consent preferences. This automation is triggered whenever a brand-new contact starts a conversation with you for the first time.
Follow these simple steps to craft your greeting message and capture their consent preferences:
Letโs get started!
Automations 2-4: Replies Based on Your Contact's Response
Let's set up your next three automations! These will be the responses triggered based on the consent level your contact replies with from your greeting message.
Each one will be a keyword automation. Just pick the "Keyword Opt-in" prebuilt template, and you're good to go!
Start by selecting the "keyword automation" prebuilt template.
We are creating an automation that will trigger anytime someone replies with the keyword "1" selecting conversational consent from your welcome message.
- Title your automation (This is an internal title)
- Example: "ITR Menu - Main - Consent - 2 - Option 1"
- Condition type: AND
- Choose your conditions: (ALL of these conditions must be met)
- CONDITION 1:
- Text Received Exactly Matches: "1"
- CONDITION 2:
- Contact has Tag:
- "Main - Consent - 1"
- Contact has Tag:
- Choose your actions:
- ACTION 1:
- Action upon met condition: "Send A Reply Immediately"
- Text: Write your message.
- For this purpose of gathering consent, we suggest a message like this:
"Sounds good! We'll only respond to texts you send us! Now, how can we help you?"
- For this purpose of gathering consent, we suggest a message like this:
- ACTION 2:
- Action upon met condition: "Add tag to contact immediately"
- Create tag: "Main - Consent - 2"
- ACTION 1:
- CONDITION 1:
Create a new automation and select the "keyword automation" prebuilt template.
Now, we are creating the automatic message that replies to a contact who has replied with the keyword "2" for informational consent:
- Title your automation (This is an internal title)
- "ITR Menu - Main - Consent - 2 - Option 2"
- Condition type: AND
- Choose your conditions: (ALL of these conditions must be met)
- CONDITION 1:
- Text Received Exactly Matches: "2"
- CONDITION 2:
- Contact has Tag
- "Main - Consent - 1"
- Contact has Tag
- CONDITION 1:
- Choose your actions:
- ACTION 1:
- Action upon met condition: "Send A Reply Immediately"
- Text: Write your message.
- For this purpose of gathering consent, we suggest a message like this:
"Sounds good! We'll only initiate texts with you about informational topics. Now that we've completed that, how can we help you?"
- For this purpose of gathering consent, we suggest a message like this:
- ACTION 2:
- Action upon met condition: "Add tag to contact immediately"
- Create tag: "Main - Consent - 2"
- ACTION 3:
- Action upon met condition: "Update consent level immediately"
- Update consent to: "informational"
- ACTION 1:
Create a new automation and select "Keyword Automation" from the prebuilt templates.
This keyword automation will trigger when someone replies to your greeting with the keyword "3" choosing promotional consent:
- Title your automation (This is an internal title)
- "ITR Menu - Main - Consent - 2 - Option 3"
- Condition type: AND
- Choose your conditions: (ALL of these conditions must be met)
- CONDITION 1:
- Text Received Exactly Matches: "3"
- CONDITION 2:
- Contact has Tag
- "Main - Consent - 1"
- Contact has Tag
- CONDITION 1:
- Choose your actions:
- ACTION 1:
- Action upon met condition: "Send A Reply Immediately"
- Text: Write your message.
For this purpose of gathering consent, we suggest a message like this:
"Sounds good! We'll be able to send you promotional texts as well as informational texts! Now, how can we help you?"
- ACTION 2:
- Action upon met condition: "Add tag to contact immediately"
- Create tag: "Main - Consent - 2"
- ACTION 3:
- Action upon met condition: "Update consent level immediately"
- Update consent to: "Promotional"
- ACTION 1:
Automations 5-7: Managing Tags
The ITR runs on a sequence of automations , making everything smooth and effortless. It uses the tags on a contact's profile as indicators
to figure out which messages to send next
. To keep everything organized, the next three automations are designed to manage those tags
โmaking sure the ITR always knows exactly which message to send to the right contact at the right time
!
From your Automations tool, select "Create Automation" and choose the "contact tagging" prebuilt automation.
- Title your automation (This is an internal title)
- "ITR Menu - Main - Tag Mgmt - Consent 1"
- Condition type: AND
- Choose your conditions: (ALL of these conditions must be met)
- CONDITION 1:
- Tag Added to Contact is "MAIN - CONSENT - 2".
- CONDITION 1:
- Choose your actions:
- ACTION 1:
- Action upon met condition: "Remove tag from contact immediately"
- Tags: "Main - Consent - 2"
- Action upon met condition: "Remove tag from contact immediately"
- ACTION 2:
- Action upon met condition: "Remove tag from contact immediately"
- Tags: "Main - Consent - 3
- Action upon met condition: "Remove tag from contact immediately"
- ACTION 1:
From your Automations tool, select "Create Automation" and choose the "contact tagging" prebuilt automation.
- Title your automation (This is an internal title)
- "ITR Menu - Main - Tag Mgmt - Consent 2"
- Condition type: AND
- Choose your conditions: (ALL of these conditions must be met)
- CONDITION 1:
- Tag Added to Contact: "MAIN - CONSENT - 2".
- CONDITION 1:
- Choose your actions:
- ACTION 1:
- Action upon met condition: "Remove tag from contact immediately"
- Tags: "Main - Consent - 1"
- Action upon met condition: "Remove tag from contact immediately"
- ACTION 2:
- Action upon met condition: "Remove tag from contact immediately"
- Tags: "Main - Consent - 3"
- Action upon met condition: "Remove tag from contact immediately"
- ACTION 1:
From your Automations tool, select "Create Automation" and choose the "contact tagging" prebuilt automation.
- Title your automation (This is an internal title)
- "ITR Menu - Main - Tag Mgmt - Consent 3"
- Condition type: AND
- Choose your conditions: (ALL of these conditions must be met)
- CONDITION 1:
- Tag Added to Contact: "MAIN - CONSENT - 2".
- CONDITION 1:
- Choose your actions:
- ACTION 1:
- Action upon met condition: "Remove tag from contact immediately"
- Tags: "Main - Consent - 1"
- Action upon met condition: "Remove tag from contact immediately"
- ACTION 2:
- Action upon met condition: "Remove tag from contact immediately"
- Tags: "Main - Consent - 2"
- Action upon met condition: "Remove tag from contact immediately"
- ACTION 1:
We're Here to Help!
Need help creating your ITR? Weโve got your back! Just text us at 309-605-0390, say the word, and weโll jump in to assist you. Letโs make it easy and stress-free!