Multisite Functionality Manual
- Overview
- Enabling Multisite Functionality
- Sites Tab Functionality
- Creating a Broadcast for Specific Sites
- Creating Tags for Specific Sites
- Creating Automations for Specific Sites
- Creating a Scheduler for Specific Sites and Phone Numbers
Multisite Functionality Manual for Corporate-Branch Structures
Overview:
This manual outlines the implementation of multisite functionality within your Beetexting account. It describes how centrally managed data, branch-level operations, and enterprise-wide integrations are supported.
By enabling multisite capabilities—with fine-grained control over data visibility, ownership, and access—Beetexting can better support diverse operational structures, strengthen strategic partnerships, and drive scalable growth.
Enabling Multisite Functionality:
To activate Multisite support within the Beetexting application, follow the steps below. This functionality is only accessible to users with Super Admin privileges.
Step-by-Step Instructions
- Log In as Super Admin. Ensure you are logged into the Beetexting application with Super Admin credentials.
- Within your browser, navigate to app.beetexting.com and log in to access multi-site settings.
- Navigate to Settings
From the left-side navigation menu, click on Settings. The system will display the Settings page. - Select the Organization Tab
Within the Settings page, click on the Organization tab. - Enable Multisite Toggle
Locate the Multisite toggle button within the Organization tab interface. - Confirmation & UI Update
Upon clicking the toggle: - A confirmation message may be shown (if configured.
- The UI will refresh to display a new Sites tab alongside the Organization tab.
Important: Once multisite is enabled, it cannot be disabled.
Post-Enablement Notes
- Enabling multisite is a one-time irreversible action.
- This change affects data structuring, access control, and user interface across the organization.
- Contacts, tags and notes behavior will now follow the site-specific settings.
Accessing the Sites Tab:
To begin using multi-site functionality, the user must first enable the feature:
- Navigate to app.beetexting within a browser and login.
- Navigate to the Organization tab.
- Locate and toggle the “Enable Multi-Site” switch.
- Once enabled, a new “Sites” tab will appear adjacent to the Organization tab in the navigation menu.
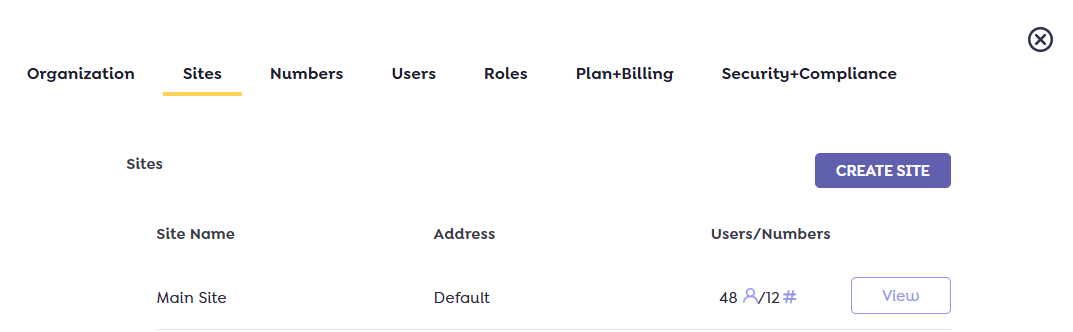
Sites Tab Functionality:
The Sites tab is available exclusively to Super Admins and is designed to:
- Create and manage sites within the organization.
- Assign one or more phone numbers to each site during creation or management.
- These phone numbers serve as access points for users assigned to the site.
- All users granted access to a phone number will automatically have access to the corresponding site and related information such as contacts, tags, and notes.
Sites act as logical business units (e.g., offices, departments, locations), enabling controlled visibility and user operations across separate segments of the organization.
Creating a New Site:
The following steps guide users through the process of creating a new site within the site tab:
Step-by-Step Instructions:
- Navigate to the Sites Tab
Ensure the multi-site feature is enabled under the Organization tab. Once enabled, the Sites tab becomes visible in the main navigation menu. - Click on ‘Create Site’
Locate and click the ‘Create Site’ action button. This will open the Create Site screen, as illustrated in the figure below.
- Enter Site Details
In the Create Site form, Input the Site Name and Site Address in the respective fields. From the list provided, select the phone numbers to be associated with this site. These phone numbers will define user access to the site.
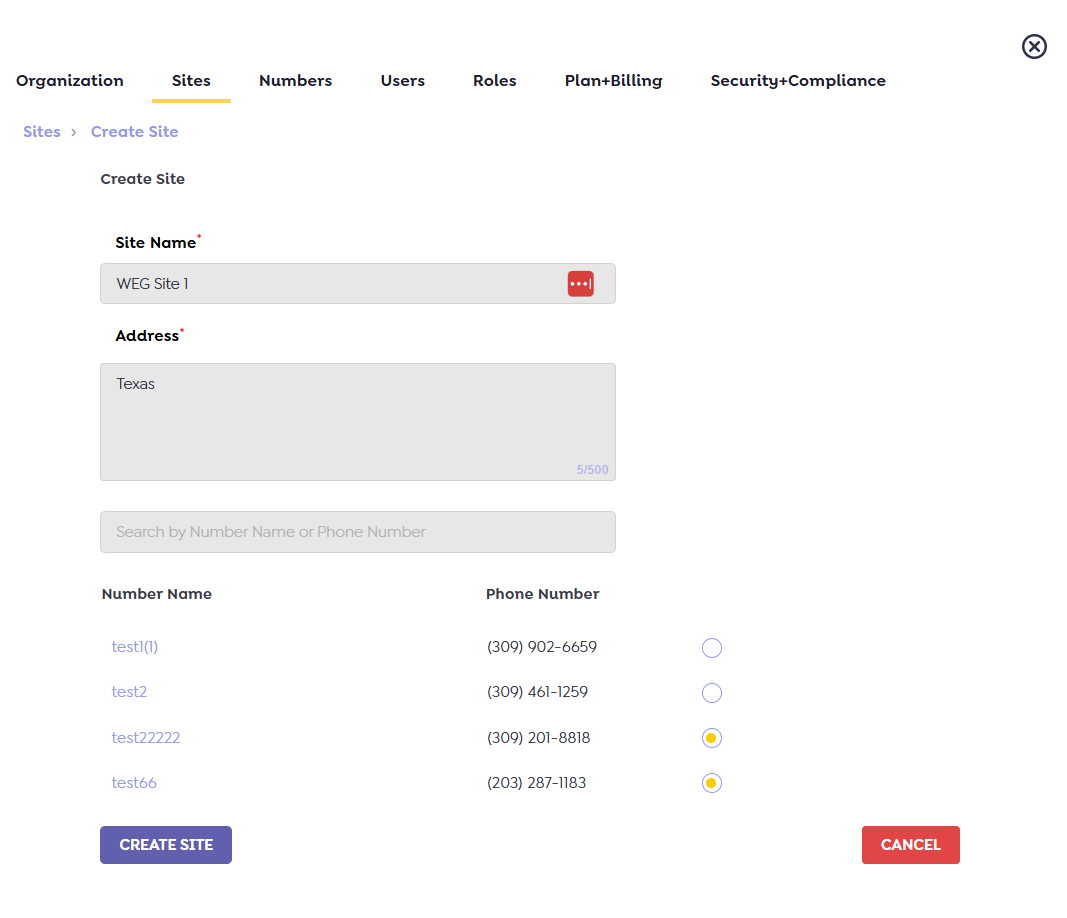
- Submit the Site
After filling in the required details and selecting the appropriate phone numbers, click the ‘Create Site’ button to complete the process. - Confirmation Message
Upon successful creation, a toaster notification will appear confirming:
“New site [Site Name] created successfully.” - View the Created Site
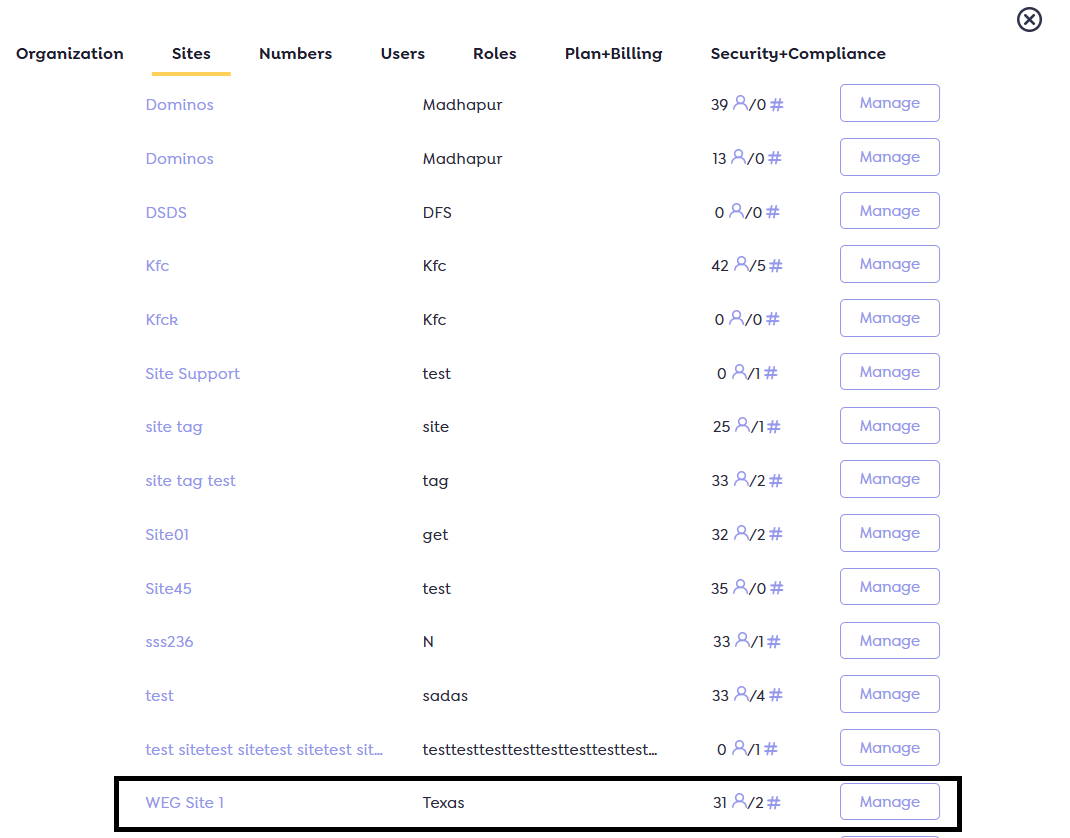
The newly created site, along with its address, will now appear in the Sites tab list. Users can return to this list at any time to view, edit, or manage existing sites.
Manage Existing Custom Site:
To update an existing site’s information or manage its associated phone numbers, follow the steps below:
- How to Access Site Management:
- Navigate to the Sites Tab
From the main navigation menu, go to the Sites tab to view the list of existing sites. - Click ‘Manage Site’
Locate the site you wish to modify and click on the ‘Manage Site’ button associated with it. This action will open the Site Management screen.
Editable Options on the Site Management Screen:
- Update Site Name
Modify the site’s name as needed. - Edit Site Address
Update the physical address associated with the site. - Save Changes
- Once all necessary updates have been made on the ‘Manage Site’ screen, click the ‘Save’ button to apply the changes.
- The system will save updates, display a successful toaster message, and return to the Sites tab.
- Confirmation Notification
A toaster message will confirm successful updates with a message like:
“Site details saved successfully.” - Manage Phone Numbers
Users can manage the phone numbers of the sites they have access to. When this option is clicked, the system redirects to the Numbers tab. - Manage Site Numbers
The Manage Site Numbers feature allows administrators to add new phone numbers to a site or transfer existing numbers between sites, including the main site. - Add Numbers to Site
Under the “Add Numbers to Sit e” sub-tab:
- Users can assign one or more unassigned phone numbers to the selected site.
- Once added, these numbers become fully associated with the site, and users with access to the number will automatically gain access to the site.
- Upon clicking ‘Save’, the system will apply the changes and display a toaster message stating: ‘Phone numbers have been assigned to [Site Name].
- Upon clicking ‘Cancel’, the system will return to the ‘Manage Site’ screen without saving any changes.
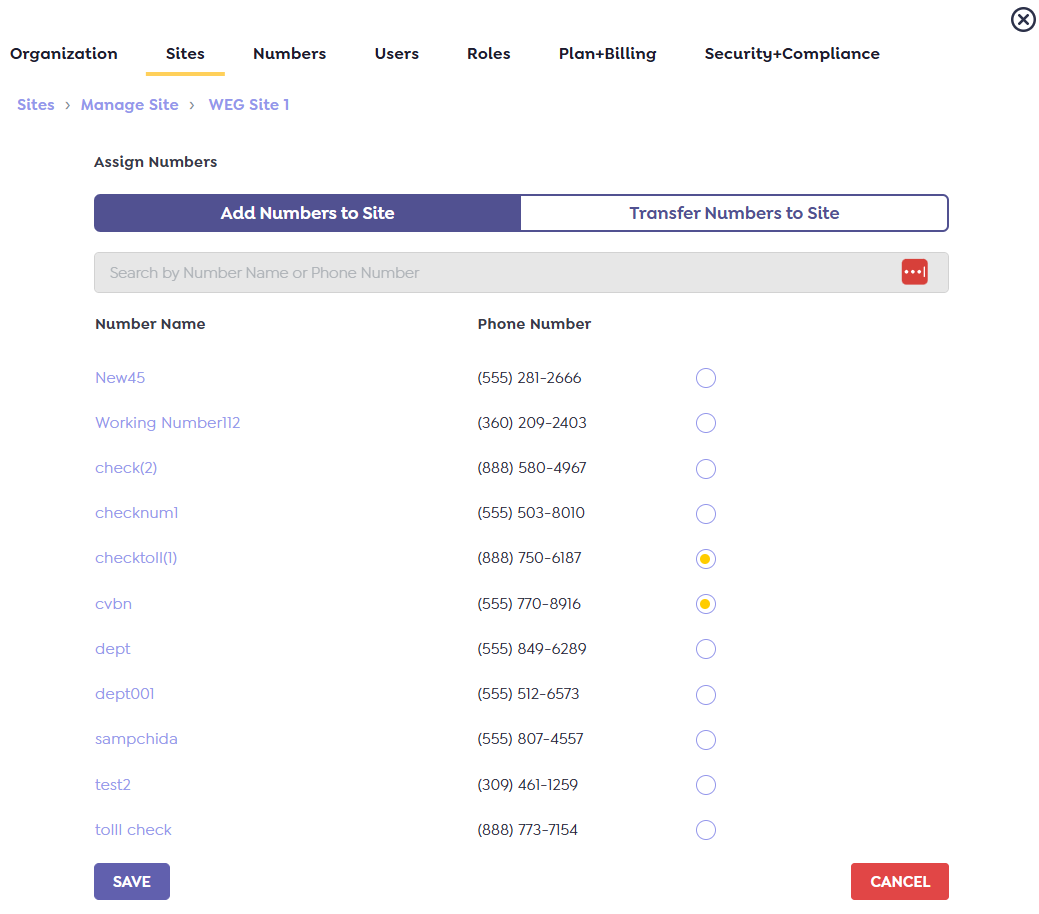
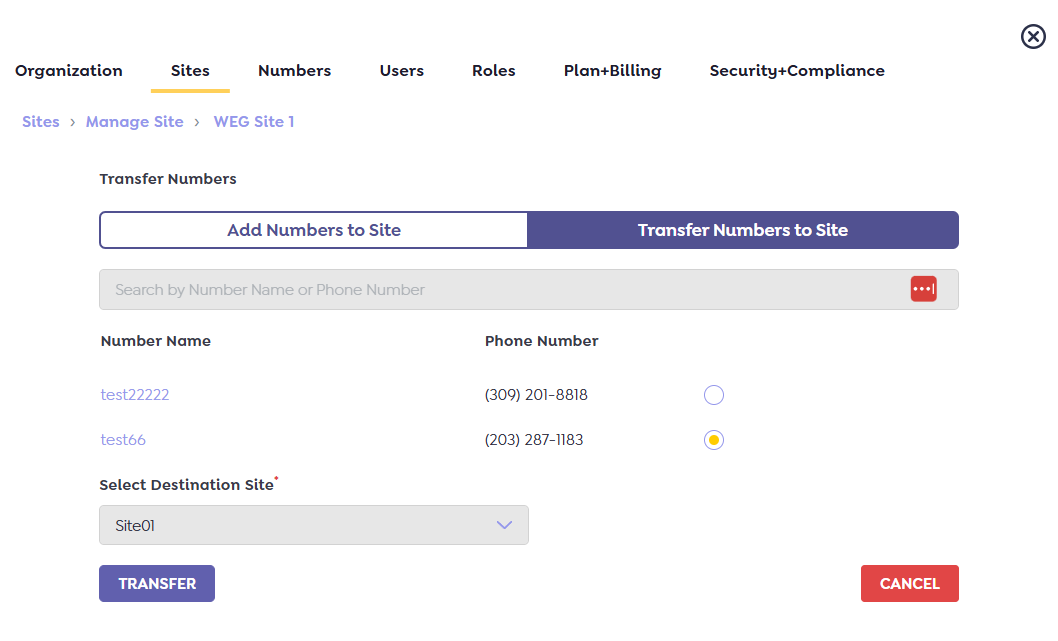
- Transfer Numbers to Another Site
Under the “Transfer Numbers to Site” sub-tab:
- Users can reassign existing phone numbers from the current site to a different site, including the Main Site.
- This functionality is useful for reorganizing operational workflows and reallocating communication resources as needed.
- Select the numbers you wish to transfer.
- Choose the destination site from the dropdown menu.
- Upon clicking the ‘Transfer’ button, the system will display a confirmation popup to review the action.
- Once the user confirms, the system will transfer the selected phone numbers and display a success message: “Phone numbers have been successfully transferred to [Destination Site Name].”
- Clicking ‘Cancel’ will return the user to the Manage Site screen without making any changes.
Note:
Once a phone number is transferred, all associated data—including contacts, conversations, and user assignments—will be transferred from the original site to the new site.
Accessing and Managing Numbers for Multi-Site Management
Once a user has been assigned access to one or more sites, they can manage the associated phone numbers under the Numbers tab. This includes assigning new numbers to specific sites and viewing or updating existing numbers.
Assigning Numbers to a Site
To assign a number to a specific site:
- Navigate to the Settings page using the left-side navigation menu.
- Click on the Numbers tab within the Settings page.
- Click the “Add Number” button.
- In the number assignment form, select the desired site from the dropdown.
- Enter the required number details and confirm the assignment.
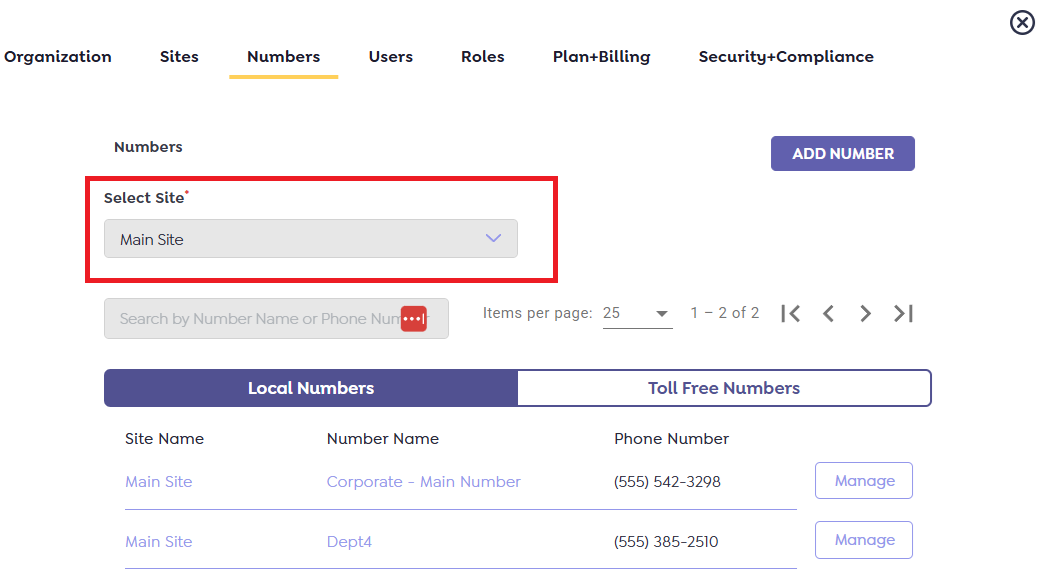
Viewing Numbers by Site
Users can only view numbers for the sites they have been granted access to. To view numbers for a specific site:
- Navigate to Settings
From the left-hand navigation panel, click on Settings. This will open the Settings page. - Select the Numbers Tab
Within the Settings page, click on the Numbers tab.
The system will display the below screen listing numbers based on site selection.
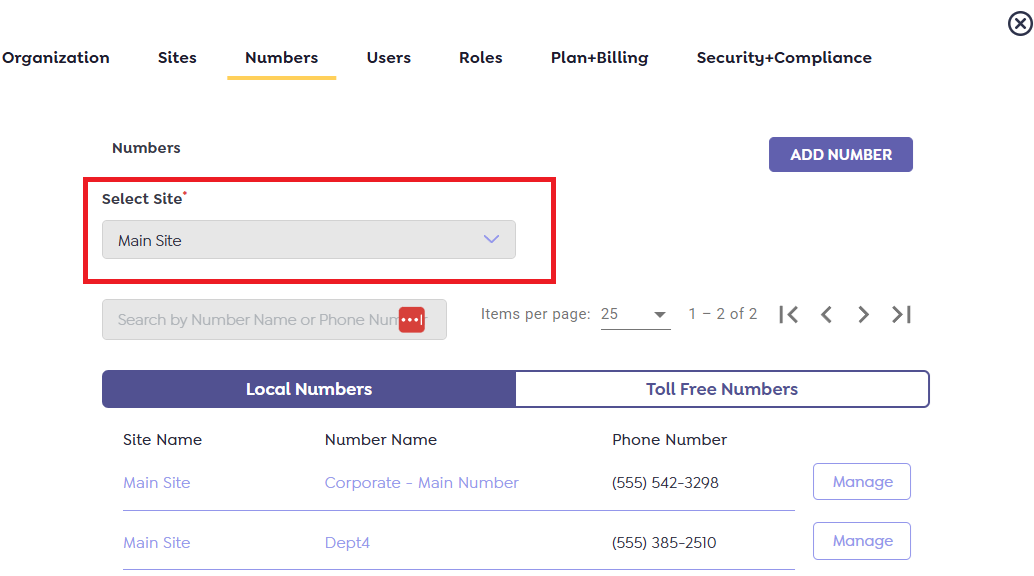
- Choose a Site
Use the site selection dropdown or list to choose the site you want to manage or view numbers for. - Manage Numbers
Once a site is selected, the system will display all phone numbers associated with that site.
You can now:- View assigned numbers
- Edit or remove existing numbers
- Transfer the number to another site.
Transferring a Number to Another Site
If a user wishes to transfer a phone number from one site to another, this can be done through the Numbers tab in the Settings section.
Steps to Transfer a Number:
- Navigate to the Numbers Tab
Go to the Settings page from the left-side navigation menu and select the Numbers tab. - Select the Current Site
Use the Select Site dropdown to choose the site where the number is currently assigned. - Click “Manage” for the Number to Transfer
Find the number you wish to transfer and click the Manage button next to it.
The system will display the ‘Number’ screen below.
- Reassign the Number
In the Site Assignment dropdown, select the new site you want the number transferred to. - Save Changes
Click Save to proceed. - Confirm the Transfer
A warning message will appear: “All of the information or data related to this number will be transferred from the current site to the selected site.” - Review the message and confirm to complete the transfer.
- Once confirmed, the number will be reassigned to the selected site, and all associated data will be moved accordingly.
Accessing the Users Tab for Multi-Site Management
Users can be added to the system and assigned to specific sites via the Users tab in the Settings section. Follow the steps below to invite a new user:
Steps to Invite a New User:
- Navigate to the Settings Page
From the left-hand navigation menu, click on Settings to open the Settings page. - Open the Users Tab
Within the Settings page, click on the Users tab to view and manage user accounts. - Click “Add User”
Click the Add User button. The system will display the user invitation form below.
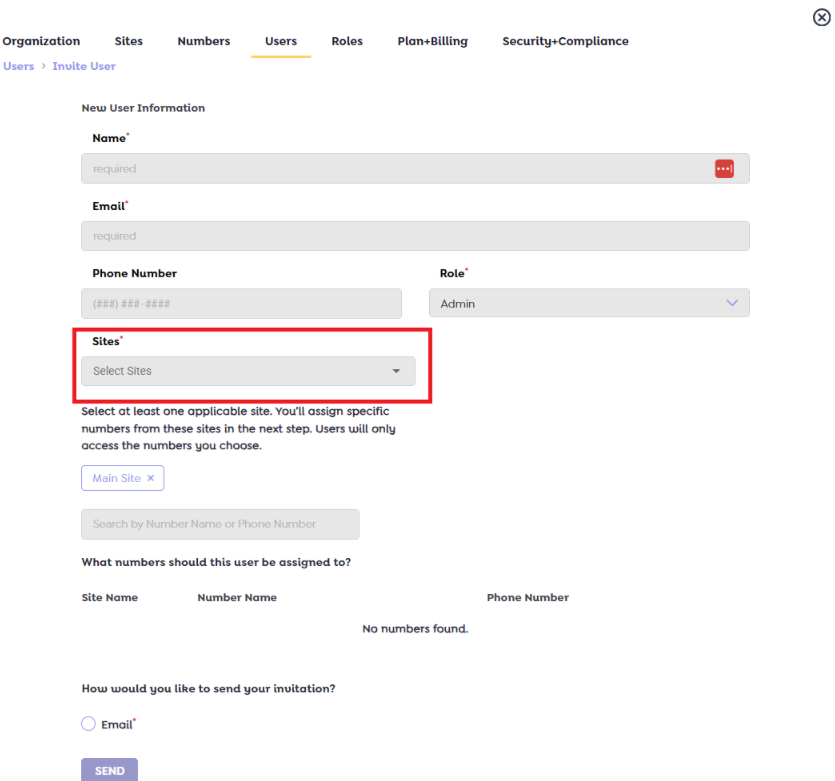
- Fill out the required fields in the form, including:
- Assign Sites
In the ‘Site Assignment’ drop down, select one or more sites the user should have access to. - Invite the User
After completing all necessary fields, click the Invite User button.
An invitation email will be sent to the user with instructions to set up their account.
- Assign Sites
Managing User Site Access
- Within the Settings page, navigate to the Users tab to view and manage all user accounts.
- To assign site access to a user:
- Locate and click on the user you want to manage.
- In the ‘Site Assignment’ dropdown, select one or more sites that the user should have access to.
- After making your selection, click Save to apply the changes.
- The user’s access will be updated immediately, allowing them to interact with the assigned sites as per their role permissions.
Manual Contact Addition:
The manual contact addition feature allows users to add a contact to specific sites within the system. This section outlines the step-by-step process to successfully create and assign a contact.
Step-1 Access the Add Contact Interface
- Navigate to the Contacts section of the application.
- Click on the “Add Contact” button.
- A contact creation form will appear, prompting you to enter the required information.
Step 2: Complete the Contact Form
Mandatory Fields: Fill in all required fields marked with an asterisk (*), such as:
- First Name
- Phone Number and Sites
- Other required optional fields as specified by your organization
Step 3: Assign Sites
- Click on the Sites multi select drop-down menu.
- A list of available sites will appear.
- Check the boxes for the sites you want the contact to be associated with.
- Contact can be assigned to one or multiple sites.
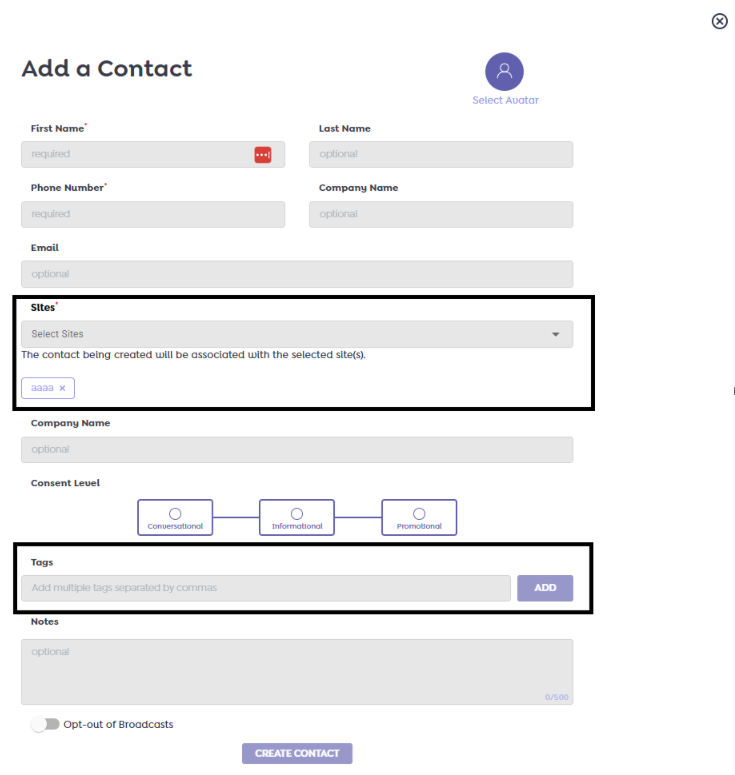
Step 4: Apply Tags (Optional)
- After selecting the sites, the system dynamically displays the available tags corresponding to the chosen sites.
- You may apply one or more tags if you want the contact to be included.
Note: Tags are site-specific, meaning you will only see the tags that are relevant to the selected sites.
Example:
If you select Site 1 and Site 2, the tag options will update to reflect only those available for Site 1 and Site 2. Tags from unselected sites will not be shown.
Step 5: Create the Contact
- Once all mandatory fields are filled and sites are selected (and optionally, tags applied), click on the “Create Contact” button.
- The contact will be created and will automatically appear under the selected sites, with any applicable tags applied.
Contacts added manually will follow the same visibility and data management rules as those added through automated or imported methods.
Bulk Import of Contacts via CSV File Upload:
The Import Contacts feature allows users to upload contacts in bulk using a CSV file. This functionality is designed for efficiency and supports assigning contacts to one or more custom sites beyond the default Main Site. Follow the instructions below to complete the process:
Step-by-Step Instructions
- Navigate to the Contact Import Interface
- Go to the Contacts tab within the Beetexting application.
- Click on Import Contacts to launch the bulk upload interface. The system displays the following screen.
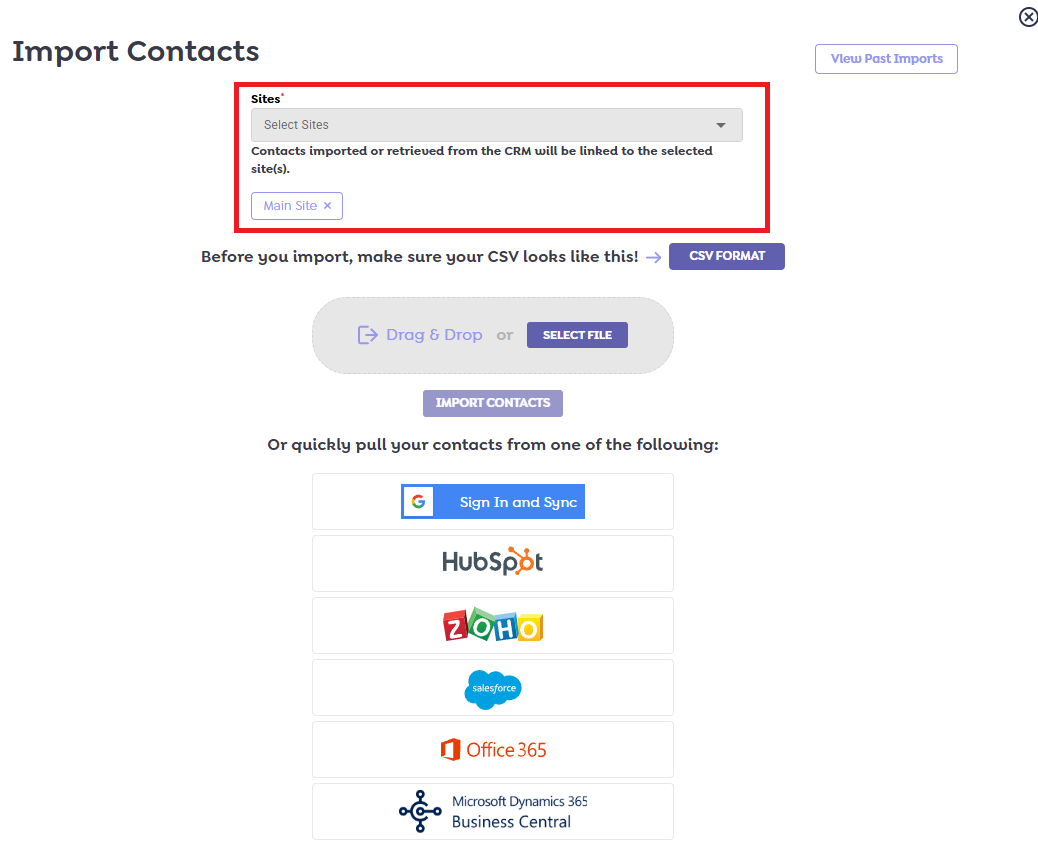
- Select Target Sites
- The system will automatically pre-select Main Site by default.
- To import contacts into multiple custom sites, simply multi-select the desired sites from the Sites drop-down menu.
- If you do not want to import contacts into the Main Site, you may remove it from the selection.
- This flexibility allows you to direct contacts to specific sites as per your organizational structure.
- Upload Your CSV File
- Prepare your CSV file according to the platform’s required format (refer to the [CSV Formatting Guidelines] section if available).
- Upload the file by:
-
- Dragging and dropping it into the designated upload area, or
- Clicking to browse and select the file from your local drive or cloud storage.
-
- Execute Import
- Once the target sites are selected and the file is uploaded, click on the Import Options button.
- The system will process the import and distribution of same contacts to all selected sites accordingly.
Ensure that your CSV file includes valid contact data and follows the expected template format.
Bulk Import of Contacts via CRMs:
Beetexting allows users to efficiently import contacts in bulk directly from supported CRM platforms, streamlining contact management across multiple sites. This feature enables seamless integration between your CRM and Beetexting, ensuring contacts are accurately assigned to the appropriate site(s) for communication and campaign management.
Step-by-Step Instructions
1. Navigate to the Contact Import Interface
- Open the Contacts tab within the Beetexting application.
- Click on Import Contacts to launch the contact import interface.
- The system will display the Import from CRM screen.

- Select Target Sites
- The system automatically pre-selects Main Site as the default import destination.
- To import contacts into multiple custom sites, open the Sites dropdown and multi-select the sites where the contacts should be assigned.
- If you do not wish to include Main Site, simply deselect it.
- Choose Your CRM Source
- Authenticate and Authorize Access
- You may be prompted to log in to your CRM and authorize Beetexting to access your contact information.
- Follow the on-screen instructions to complete the integration.
- Once authenticated, the system will return to the import interface with CRM data available for selection.
- Select and Import Contacts
- Browse your contact groups, filters, or segments from within the CRM interface.
- Choose the contacts or list segments you want to import.
- Confirm your selection and proceed with the import process.
After initiating the import, Beetexting will display a confirmation message.
Contacts will be automatically assigned to the selected sites and appear under the Contacts tab upon completion.
Creating Automations for Specific Sites:
Beetexting empowers users to streamline communication workflows by creating automated actions triggered by specific events or conditions. With multi-site support, automations can be tailored and applied to the phone numbers associated with individual sites, ensuring relevant and site-specific interactions.
Users are allowed to create automations for the sites and numbers to which they have access.
Common Automation Types
- Out-of-Office Automation: Automatically respond to messages received outside of your business hours
- Missed Call Automation: Trigger a message when a contact calls but doesn’t reach you.
- Keyword Opt-In Automation: Allow contacts to opt-in to messaging campaigns by texting a specific keyword.
- Help Automation: Create a Help keyword trigger that responds with support or assistance details.
- Contact Tagging Automation: Automatically tag contacts based on their actions, such as message content or keyword usage.
Step-by-Step Instructions: Creating an Automation
- Access the Tools Panel
- Navigate to the right-hand side of the main menu panel in the Beetexting application.
- Click on the Tools option.
- The Tools interface will open, with the Broadcasts tab selected by default.
2. Navigate to the Automations Tab
- Click on the Automations tab located in the top navigation.
- The system will display the Automations dashboard, showing a list of existing automations.
3. Initiate a New Automation
- Click the Create Automation button.
- The system will display the Create Automation interface.
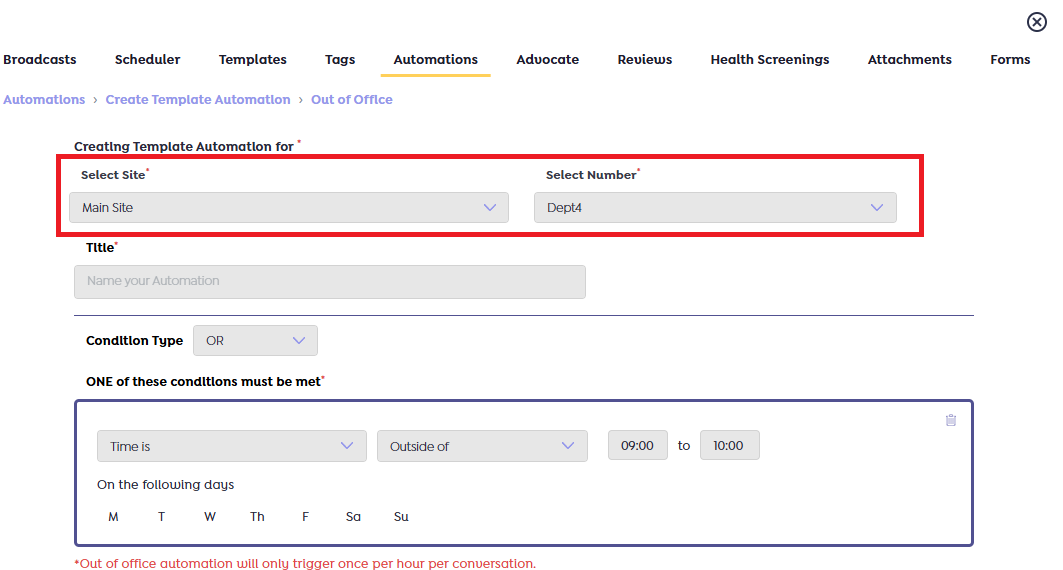
4. Select Automation Type
- Choose the type of automation you want to create (e.g., Out-of-Office, Missed Call, Keyword Opt-In, etc.).
- The system will display configuration options specific to the selected automation type.
5. Select Site and Phone Number
- From the Select Site dropdown, choose the site where this automation should apply.
- This will automatically filter the phone numbers in the next step.
- From the Select Number dropdown, choose the phone number that will be associated with the automation.
- Only numbers linked to the selected site will be displayed.
6. Define Automation Rules and Actions
- Apply the conditions or triggers relevant to your automation type (e.g., specific keywords, timeframes, call behavior).
- Compose the automated response message and configure any additional settings (e.g., tags, delays, response timeouts).
7. Save and Activate
- Once your automation settings are complete, click the Create button.
- Your automation will be saved and become active immediately (or scheduled, depending on configuration).with
Creating a Scheduler for Specific Sites and Phone Numbers
The Scheduler feature allows you to automate the sending of messages and internal notes. You can schedule communications to be sent at a future date and time, and configure them to recur at regular intervals if desired. This helps maintain consistent engagement and ensures important information is sent at the right time—automatically.
Follow the steps below to create a scheduled message for a specific site and associated phone number.
Step-by-Step Guide
- Access the Scheduler Tool:
- Navigate to the Tools tab from the left-side main menu.
- Click on the ‘Scheduler’ option.
- Open the Scheduler Interface:
- The system will display the Scheduler dashboard as shown below.
- To create a new text schedule, select Text from the content type dropdown.
- Click on the Schedule Text button.
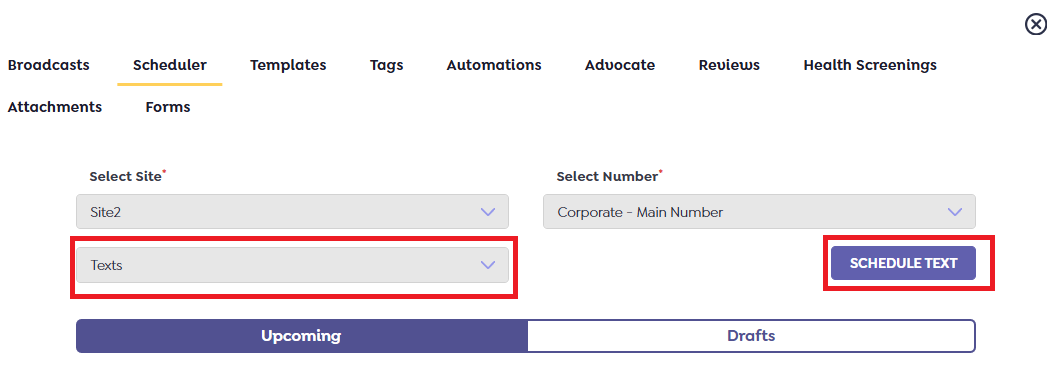
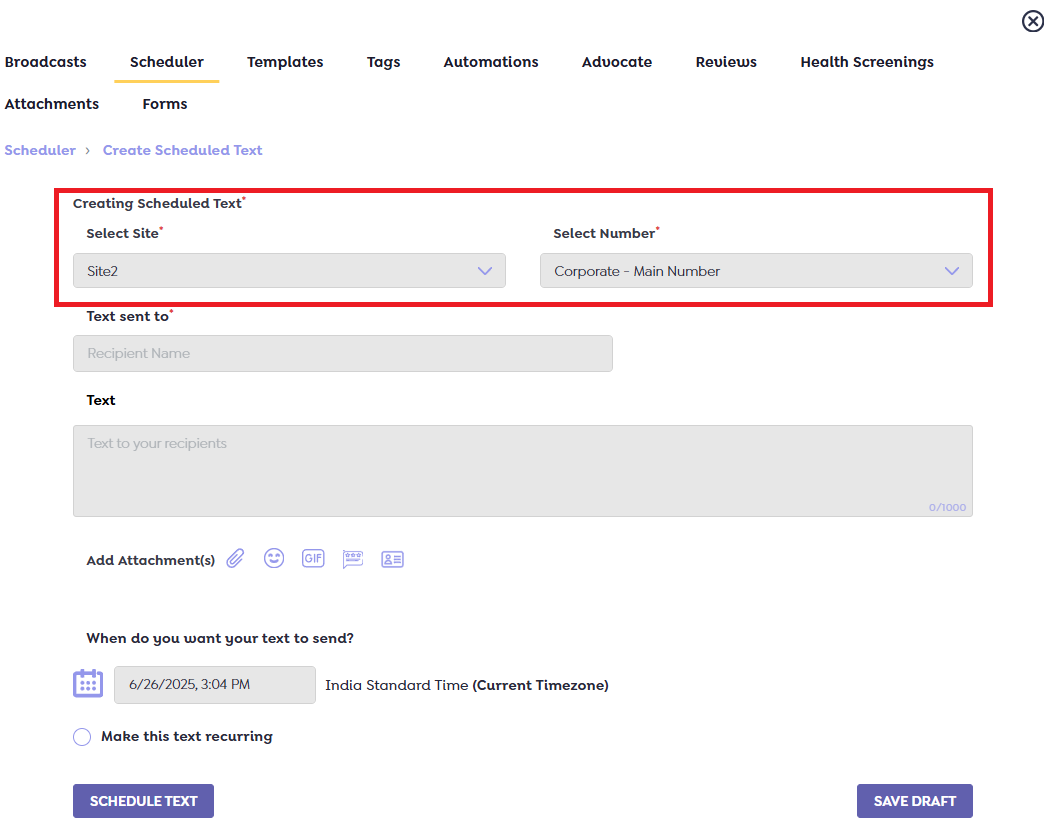
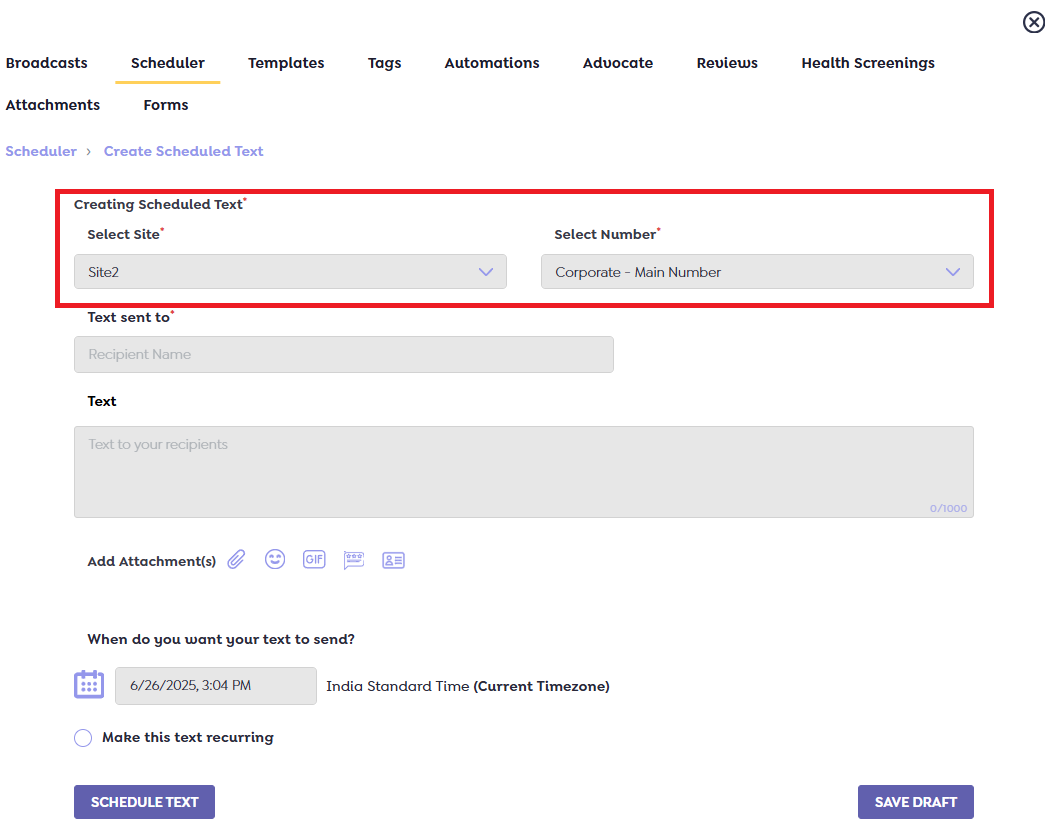
3. Configure the Schedule Details:
- Clicking the Schedule Text button will open the following screen. On the ‘Create Scheduled Text’ screen, complete the following fields:
- Select Site: Choose the appropriate site from the dropdown. This ensures the phone numbers listed in the next field are filtered according to your selected site.
- Select Number: Pick a phone number from the filtered list. This is the number from which the scheduled text will be sent
- Text Sent To: Enter the recipient’s contact number or identifier in this field.
- Text: Type your message content here.
- Schedule Date and Time: Specify when the message should be sent. You may also have the option to configure recurring schedules if applicable.
Viewing and Updating Scheduled Texts and Internal Notes for Specific Sites and Numbers
The Scheduler interface provides a centralized place to view, manage, and update all your scheduled messages and internal notes, including drafts. This allows admins and team members to keep track of planned communications, make necessary edits, or manage drafts with ease across multiple sites and associated phone numbers.
Step-by-Step Guide to Schedule Texts
- Access the Scheduler Tool:
- Navigate to the Tools tab in the left-hand main menu.
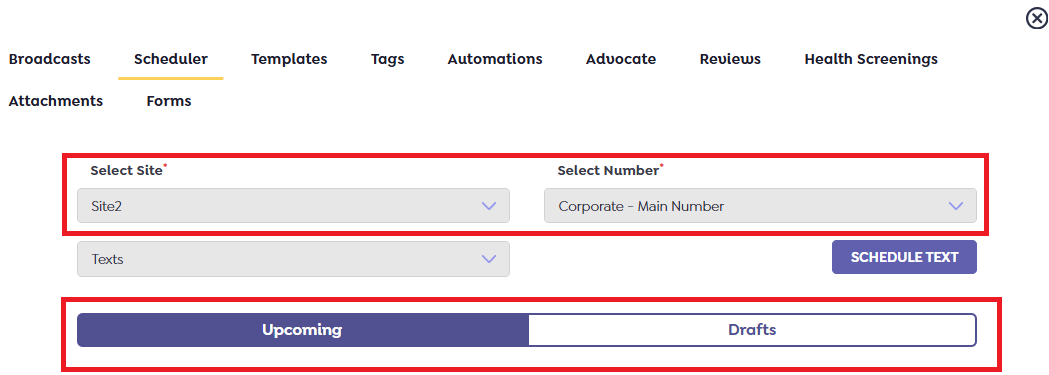
- Click on the Scheduler option to open the scheduler dashboard. The system displays the following screen.
- Select a Site and Phone Number:
- In the Select Site dropdown, choose the site for which you want to view or manage scheduled texts.
- The system will automatically filter the available phone numbers in the Select Number dropdown based on the selected site.
- Choose the desired phone number from the list.
- Filter by Content Type:
- From the content type dropdown (e.g., Texts, Internal Notes, etc.), select Texts to view scheduled text messages.
- The system will display all upcoming scheduled texts and saved drafts associated with the selected site and phone number.
View or Manage Scheduled Messages:
- From the Scheduler screen, you can view message details—such as recipient, message content, scheduled date, recurrence (if any), and status (Scheduled or Draft)—by selecting a site and number from the dropdown menu shown in the screenshot below.
- To edit or update a scheduled message or draft:
- Click on the Manage button next to the message.
- Make the necessary changes in the schedule, content, recipient, or recurrence.
- Save your changes as needed.
Drafts can be finalized and scheduled at any time by opening them via the Manage option.
Scheduling Internal Notes for Specific Sites and Numbers
In addition to scheduling text messages, the Scheduler also allows users to create and manage Internal Notes. Internal Notes are used to automate internal communications or reminders associated with specific sites and phone numbers, and can follow a similar scheduling flow as text messages.
Important Note
The process for scheduling Internal Notes mirrors that of Text Messages, with one key distinction: You must select Internal Notes as the content type from the dropdown before proceeding.
Steps to Schedule or Manage Internal Notes
- Access the Scheduler Tool:
- Go to the Tools tab in the left-side menu.
- Select the Scheduler option.
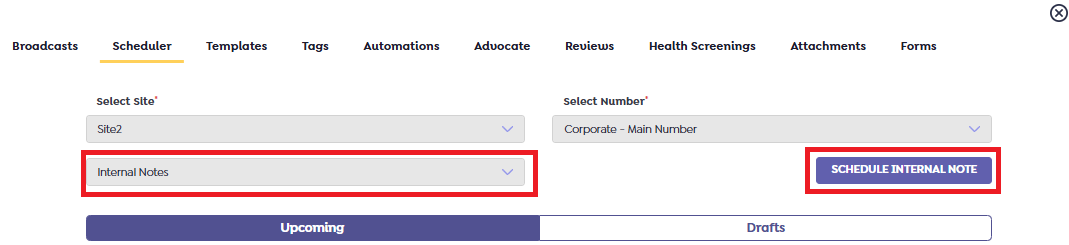
- Select Internal Notes and Configuration Options:
- In the Content Type dropdown, choose Internal Notes.
- Then, select the appropriate Site from the “Select Site” dropdown.
- Based on the selected site, the system will populate the corresponding phone numbers in the Select Number dropdown. Choose the number you’d like to send an internal note.
- Proceed with Scheduling:
- Once you’ve selected Internal Notes, the rest of the workflow (e.g., composing the note, setting the schedule, saving or editing drafts) follows the same steps as scheduling text messages:
- Enter the note’s content.
- Select the target time/date or set a recurrence.
- Save as a draft or finalize by clicking Schedule Note (or an equivalent action button).
View, Edit, or Manage Internal Notes:
- From the ‘Scheduler’ screen, use the Manage button next to any listed Internal Note to make edits or updates.
- You can view scheduled Internal Notes or filter them alongside drafts using the scheduler dashboard interface.